අපි කලින් පොස්ට් එකේදී conditional
statement use කරන හැටි කතා කරා නේ .මං මේ සැරේ කතා කරන්න
බලාපොරොතු වෙන්නේ Loop statements use කරන්නේ
කොහොමද කියල.ප්රදාන වශයෙන්ම loop statements use කරන්නේ අපිට
කිසියම් code කැල්ලක් නැවත නැවත run කරන්න තමා ප්රදානවශයෙන්ම.
මුලින්ම
කතාකරමු for loops ගැන
for ලූප් එකක මුලික syntax
එක තමා පහත විස්තරකරල තියේන්නේ
for
(initialization; termination;increment) {
//body of the loop
}
මේ ලූප් එකේ කරන්න තියෙන්නේ initialization කියන
කොටසේදී අපිට ගැලපෙන විදියට veriable එකක් initialization කරගන්න
එක .ඊටපස්සේ termination එකේ
දි ලූප් එක run වෙලා එවරවෙන ඔනී condition එක දෙන්න ඕනේ මේක බොහෝවිට boolian expression
එකක් වෙන්න ඕන.අන්තිමට increment
එකේ දි initialization කරගත්තු
veriable එක increment (යම්
නියත අගයකින් වැඩිකරන්න අඩුකරන්න වගේ operation එකක් කරන්න ඕන ).සමහරුන්ට මේ කියපු දේ පැහැදිලි
නැතුව ඇති .පහත රුපසටහනිනුත් පෙන්න්වල තියන්නේ for ලූප් එක run වෙන විදිය තමා .
ඊළඟට තියන
උදාහරණ programme එක බැලුවම මොකක්ද වෙන්නේ කියල හරියටම තේරේවි .
අපි හිතමු
අපිට programme එකකින් අපේ නම 10 පාරක් ප්රින්ට් කරගන්න ඕනේ කියල.කලින් කරපු
programme වල දැනුම අනුව අපි කරන්න ඕනේ ලේසිම වැඩේ තමය් System
.out.print("My Name");
කියල 10 පාරක් type කරන්න එක .නමුත් මේක 1000 පාරක් වගේ ප්රින්ට්
කරගන්න ඕනේ නම් 1000 පාරක් System .out.print();
ගහන එක ප්රයෝගික නැහැ නේද ?එකට for ලූප් එකකින් ලේසියෙන් කරගන්න පුළුවන් මේ
විදියට .
import
java.util.Scanner;
class Example5{
public static void main(String
args[]){
Scanner
sc = new Scanner(System.in);
System.out.println("Enter
The Nomber of times you want to print: ");
int name = sc.nextInt();
for(int
i=0;i<name;i++){
System.out.println("My
Name");
}
}
}
මේකේ මම ප්රින්ට් වෙන්න ඕන වර ගන්න input එකක්
විදියට ගන්නේ.out put එක මේවගේ තමා ලැබෙන්නේ
Enter The Number of times you
want to print:
8
My Name
My Name
My Name
My Name
My Name
My Name
My Name
My Name
දැන් අපි හිතමු අපිට programme එකක් ඕනේ අපි 1
සිට 100 දක්කවා එලකම් වල එකතුව සොයන්න programme එකක් අපි දැන් බලමු එක කොහොමද
කියල ලියන්නේ .කරන්න ඕනේ 1+2+3+4+5+6+7+......... විදියට එකතුකරගෙන යන එක තමා .එක
programme එකින් කරන විදිය පහත පෙන්වල තියනවා .
class Example5{
public static void main(String
args[]){
int number=1;
for(int
i=0;i<=100;i++){
System.out.println(number+"+"+i);
number+=i;
}
System.out.println(number);
}
}
මේ
programme එක run කරලා බලන්න.දැන් ඔයගොල්ලෝ programme එකක් ලියන්න 1000 ට අඩු
ඔත්තේ සංකියා වල හා 100 ට අඩු 3 ගුණාකාර වල එකතුව හොයන්න.
මේ වගේම for ලූප් එකේ තව syntax එකක් තියනවා බලන්න පහත programme බලන්න.
for(declaration : expression)
{
//Statements
}
මේ තමා syntax
එක
class Example5{
public static void main(String
args[]){
int [] numbers = {10, 20, 30, 40,
50};
for(int x : numbers ){
System.out.print( x );
System.out.print(",");
}
}
}
එකට කියන්නේ
Enhanced for loop කියල .මේ programme එක int [] numbers
කියන්න array එකේ element ගන්න වෙනකම් run වනවා.තමා array කරේ නෑ නේ.array කියන්නේ යම් data type එකක data එකකට
වැඩියේ දන්න පුළුවන් විදියේ data structure එකක් .එක ගැන වැඩිදුර array වලදී කතා
කරමු.
For loop එකක් පහත විදියට තිබුනොත් run වෙලා
අවසන් වන්නේ නෑ .memory ඉවර වනකම් run වෙලා පරිගණකය stuck වන්නත් පුළුවන්.මේවට
කියන්නේ infinite loop කියල.
// infinite loop
for ( ; ; ) {
// your code goes here
}
දැන් අපි බලමු while ලූප් එක ගැන
මේ while ලූප් එකිනුත් for loop එකේ වගේ
repete කරන්න එක තමා කරන්නනේ.අපි මුලින්ම බලමු while ලූප් එකේ syntax එක
while(Boolean_expression)
{
//Statements
}
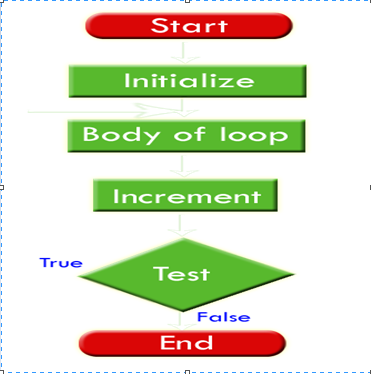
මේකේ run වෙන වාර ගනන තීරණය
කරන්නේ Boolean_expression එකින් තමය්.පහත තියන්නේ while ලූප් එක run වෙන
විදිය flow chart එකකින් දක්වල.

මේ රුපෙන් පුළුවන් ඔයාලට while ලූප් එක ඇතුලේ
process එක තේරුම් ගන්න.අපි දැන් ලියමු අර කලින් 1 -100 එකතුව ගත්තු programme එක
while ලූප් එකක් use කරලා.
class Example5{
public static void main(String
args[]){
int number = 1;
int i=0;
while (i<100) {
number+=i;
i++;
System.out.println(number+"+"+i);
}
System.out.println(number);
}
}
පහත දැක්වෙන්නේ while ලූප් වලට තව උදාහරණ
කිහිපයක්.
1)
class Test {
public static void main(String args[]) {
int x = 10;
while( x < 20 ) {
System.out.print("value of x : " + x );
x++;
System.out.print("\n");
}
}
}
මේ programme එක 10 සිට 20 ට වෙනකම් 10 පාරක් run
වනවා.
මේ තියන්නේ out put එක
value of x : 10
value of x : 11
value of x : 12
value of x : 13
value of x : 14
value of x : 15
value of x : 16
value of x : 17
value of x : 18
value of x : 19
2)
import
java.util.Scanner;
class
JavaApplication1 {
public static void main(String[]
args) {
Scanner keyboard =
new Scanner(System.in);
System.out
.print(
"Input n: ");
int n = keyboard.nextInt();
int currentNum = 1;
int sum = 0;
int sumSquare = 0;
int sumCube = 0;
while (currentNum
<= n) {
sum = sum + currentNum;
sumSquare = sumSquare + currentNum
* currentNum;
sumCube = sumCube + currentNum *
currentNum * currentNum;
currentNum = currentNum + 1;
}
System.out.println("The sum
of the numbers from 1 to " + n + " is " + sum + ".");
System.out.println("The sum
of the squares of the numbers from 1 to " + n + " is
" + sumSquare + ".");
System.out.println("The sum
of the cubes of the numbers from 1 to " + n + " is " + sumCube + ".");
}
}
දැන් අපි බලමු do while ලූප් එක ගැන
do while ලූප් එක බොහෝදුරට while
ලූප් එකට සමාන වෙනවා පොඩි වෙනසක් තියනවා.මුලින්ම අපි එකේ syntax එක
බලමු .
do
{
//Statements
}while(Boolean_expression);
මේකේ Boolean_expression එක check කරන්නේ එක පාරක් run වූනාට පස්සේ .එක
තමා while ලූප් එකට වඩා තියන එකම වෙනස .දැන් අපි බලමු flow chart එකකින් do while
ලූප් එක run වන විදිය.

දැන් අපි බලමු මේකට උදාහරණ programme එකක්.
class Example5 {
public static void main(String[]
args){
int count = 1;
do {
System.out.println("Count
is: " + count);
count++;
} while (count < 11);
System.out.print(count);
}
}
මේ programme එකේ වෙන්නේ count++ කරාට
පස්සේ තමය් count
< 11 කියන condition එක
හරිද වැරදිද කියල check කරන්නේ.අන්තිමට count වල අගය 11වෙනවා.අපිට out put එක
බැලුවම එක තේරුම් ගන්න පුළුවන්.
Count is: 1
Count is: 2
Count is: 3
Count is: 4
Count is: 5
Count is: 6
Count is: 7
Count is: 8
Count is: 9
Count is: 10
11
දැන් ලූප් වල යදෙන වැදගත් කී word
දෙකක් ගැන බලමු(break Keyword හා continue Keyword)
මේක යොදන්නේ ලූප් ඇතුලේ if ,switch
වගේ යදෙනකොට තමය් සාමාන්යෙන්.
අපි උදාහරණයක් බලමු break Keyword එකට
class Example5 {
public static void main(String
args[]) {
int [] numbers = {10, 20, 30, 40,
50};
for(int x : numbers ) {
if( x == 30 ) {
break;
}
System.out.print( x );
System.out.print("\n");
}
}
}
මේ අපි කලින් ගත්තු උදාහරණයම තමා වෙනසකට
තියන්නේ array එකේ 30 කියන eliment එක දැක්ක ගමන් ලූප් එකින් එලියට යන්න ඕනේ.එකට
තමා if එක ඇතුලේ break; use කරලා තියන්නේ.අපිට useful විදියට ඕනෙම තැනකදී break
use කරන්න පුළුවන්.මේකේ out put එක බලාගන්න
10
20
දැන් මේකම continue Keyword
එක දාල බලමු
class Example5 {
public static void main(String args[]) {
int [] numbers = {10, 20, 30, 40, 50};
for(int x : numbers ) {
if( x == 30 ) {
continue;
}
System.out.print( x );
System.out.print("\n");
}
}
}
Out put එක පහත තියනවා
10
20
40
50
උඩ එක වගේ නොවේ මේකේ ඔක්කොම array element check
කරලා තියනවා.ඒ කියන්නේ continue Keyword
එක මගින් ලූප් එක continue කරනවා කියල.
ජාවා වල array ගැන ඊළඟ පොස්ට් එකින් බලමු......
